How I Built Stable Wi-Fi for 50 Rooms Across Four Floors Using One Internet Plan

At first glance, setting up Wi-Fi seems easy. Connect the internet cable to a router, configure the Wi-Fi name and password, and people can use the internet. Maybe I am oversimplifying it, but that is how most small home networks work.
The situation becomes different when you manage a dormitory with 50 rooms, 100+ devices, across four floors. One router cannot cover the entire building, so the obvious solution is to add more routers. If one room has weak signal, add another router nearby. If one floor has bad coverage, install another router there.
That was more or less how this dormitory network grew.
The problem was that residents kept complaining about slow internet. Sometimes the Wi-Fi signal looked strong, but the speed was terrible. Sometimes one floor worked fine while another floor became almost unusable. We also had no idea where the problem was coming from.
Was the ISP connection slow? Was one router failing? Was the cable damaged? Was one person using too much bandwidth? Or were all the routers interfering with each other?
I had to find out before buying even more routers.
The Existing Network
The dormitory had two internet plans, each with speeds of up to 400 Mbps. Each plan came with an ISP router.
Those routers were connected using long Ethernet cables to more than 20 scattered TP-Link routers around the building. Every router had its own Wi-Fi name, and some rooms had an additional router because the signal inside the room was weak. Sometimes residents were also allowed to connect directly to a router using an Ethernet cable.
The setup worked, but it was difficult to understand and even harder to troubleshoot. Every router had its own settings, the cable routes were not properly documented, and there was no central place where we could see the status of the network.
When someone complained that the internet was slow in one room, we did not know where to start. We had to check the ISP connection, the router, the cable, and sometimes other devices connected to the same network.
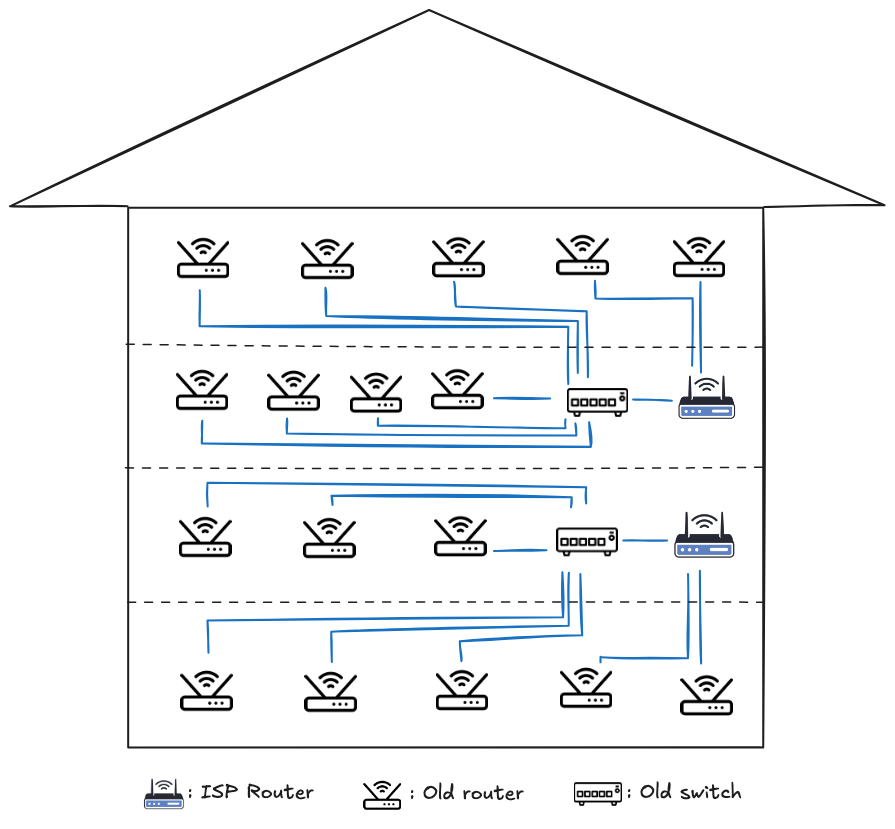
The existing network mostly used cheap TP-Link routers and long Ethernet cables. It had grown over time, one local fix at a time. Each new router solved a small problem, but the whole network became more complicated.
Router, Access Point, and Switch
Before going further, it helps to separate three roles that often get mixed up, because consumer devices usually combine them into one box.
| Role | What it does | Simple way to think about it |
|---|---|---|
| Router | Connects different networks and decides where traffic should go | The bridge between your local network and the internet |
| Access point | Provides Wi-Fi so phones and laptops can join the network wirelessly | The radio that broadcasts the Wi-Fi signal |
| Switch | Connects multiple devices with Ethernet cables inside the same network | A multiport hub for wired links |
One thing you might realize (or get confused by): your ISP “router” has multiple ports that can connect to several other routers, just like a switch — and you are right. That device from your ISP is not just a router. It is usually a router + access point + switch in one box.
The Ruijie router and gateway also have switch capability. Some more expensive Ruijie routers even have gateway capability. I will explain more about the gateway later.
| Device | Router | Access point | Switch |
|---|---|---|---|
| ISP “router” | Yes | Yes | Yes |
| Ruijie router | Yes | Yes | Yes |
| Dedicated switch | No | No | Yes |
| Access point (AP mode) | No | Yes | Sometimes |
In this article, I still say “router” a lot because that is the product I bought and installed. In the final setup, many of those routers mainly acted as access points, while the gateway handled the central network policies.
Why I Chose Ruijie
Before continuing with the problems, I should explain why I chose Ruijie for the new setup.
I wanted a router that was affordable enough to install across multiple floors, but still had features that would be useful for managing a larger network. I also did not want to keep adding random consumer routers with different configurations, because that would make the network harder to manage as it grew.
Before choosing Ruijie, I tested two more expensive routers from Asus and Tenda at home using the same internet plan. They reached around 120 Mbps, which was faster than the ISP router.
Use a router with at least Wi-Fi 5 capabilities.
I then bought a Ruijie router to compare it with them. It was around Rp200,000 cheaper, but the speed was still just as good in my test. Since I needed to install multiple routers across the dormitory, the price difference mattered. A difference of Rp200,000 per device would become significant when multiplied across the whole building.
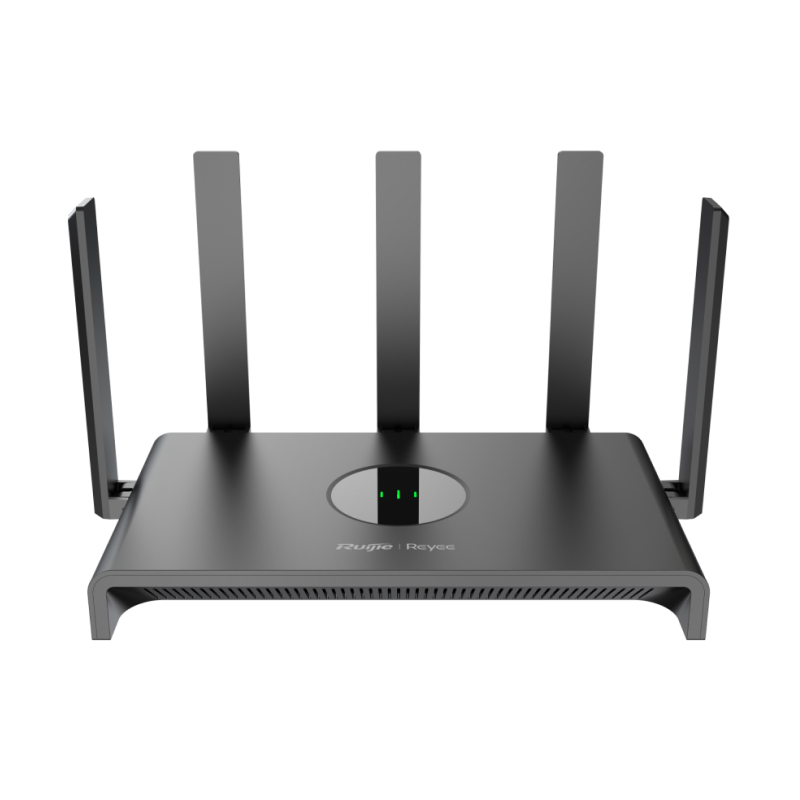
The price was not the only reason I chose Ruijie. Its devices also supported mesh networking, centralized management through Ruijie Cloud, device monitoring, bandwidth management, and other features that were difficult to manage with the old routers.
Another useful feature was the onboarding process. When the gateway and Ruijie routers are used together, I do not need to manually configure every router one by one. Once a device is connected and adopted by the Ruijie system, it can receive the network configuration from the central platform.
I still needed to check that each device was adopted correctly, but this was much faster than opening every router’s admin page and configuring the Wi-Fi name, password, and network settings manually.
I will explain these features later in the article. The mesh feature became an alternative to running Ethernet cables between floors, while Ruijie Cloud became important for managing and monitoring the final network.
Replacing the Old Routers
People complained that the Wi-Fi signal was weak inside their rooms, so I initially assumed that the router was the main reason the internet was slow.
I tested one of the old routers and got only around 5 Mbps, even though I was standing directly below it. That result looked very bad. I compared it with the ISP router and got around 80 Mbps from a similar position.
Based on that test, replacing the old routers seemed like the obvious solution.
I installed the Ruijie router at the dormitory. The signal improved, but when I ran another speedtest, the speed still stopped at around 30 Mbps. This is very different with my previous router speedtest at home.
That was when I realized the router was only part of the problem. The router was not the only problem. I had to check the cable next.
Finding the Cable Problem
I connected the new router to the ISP router using one of the existing Ethernet cables. The speed was still disappointing. I realized that the old cable is a Cat 5 cable.
Then I replaced the old cable with a newer Cat 5e cable and tested again. The speed increased significantly. I also tested a Cat 6 cable and got a similar result.
So I concluded that Cat 5 was simply too slow. The real problem was probably more specific than that. The old cable could have been damaged, badly terminated, or negotiating at a lower link speed. But based on my experience, Cat 5e or Cat 6 cables are the best choices. Just make sure to avoid sharp bends in the cable.
Use at least Cat 5e Ethernet cable for new installations, and check the link speed.
Installing Ethernet cables across four floors was not easy. The cables had to be long enough, kept tidy, and protected from damage. There was also a practical limit to how far one copper Ethernet cable could run. A normal Ethernet channel should stay within around 100 meters.
Ruijie also supports wireless mesh networking, which means you can extend the Wi-Fi coverage using multiple routers wirelessly. It looked like an attractive alternative because it could reduce the amount of Ethernet cable needed between floors.
Why I Chose Wired Backhaul Instead of Mesh
I tried the wireless mesh networking. It’s very easy to set up. You just need to turn on the router, then click the mesh button on it. It will automatically connect to the main router in a couple of minutes, without me having to manually configure anything.
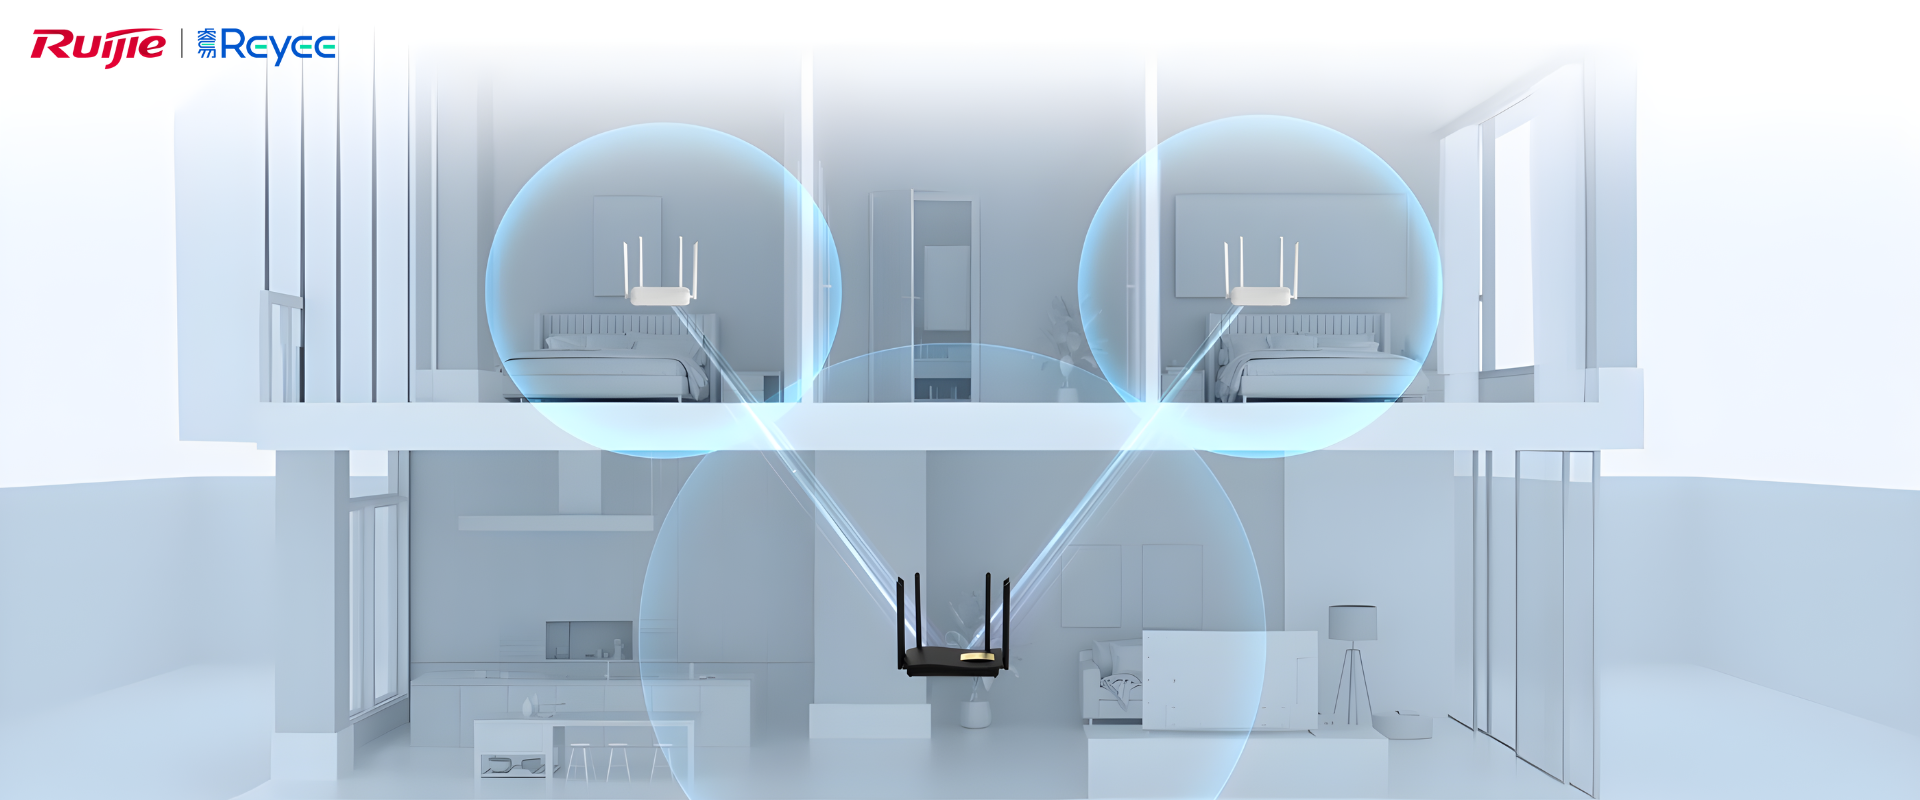
But when I tested the speed, the result was quite disappointing. Since the access points had to communicate with each other wirelessly, the walls, floor slabs, distance, and other obstacles affected that connection. When the wireless connection between access points became weak, the users connected to those access points also experienced poor performance.
Mesh can still be useful in places where installing Ethernet is difficult. It can work well when the access points have a strong wireless path between them and the amount of traffic is not too high.
For this dormitory, I preferred using Ethernet as the backhaul. The installation was more difficult, but the connection was more predictable.
Connecting the Floors
The ISP router had only a limited number of LAN ports, so it could not connect directly to every router or access point in the building.
There were two possible designs.
The first option was to use a dedicated switch. The ISP router would connect to the switch, and every access point would connect to that switch.
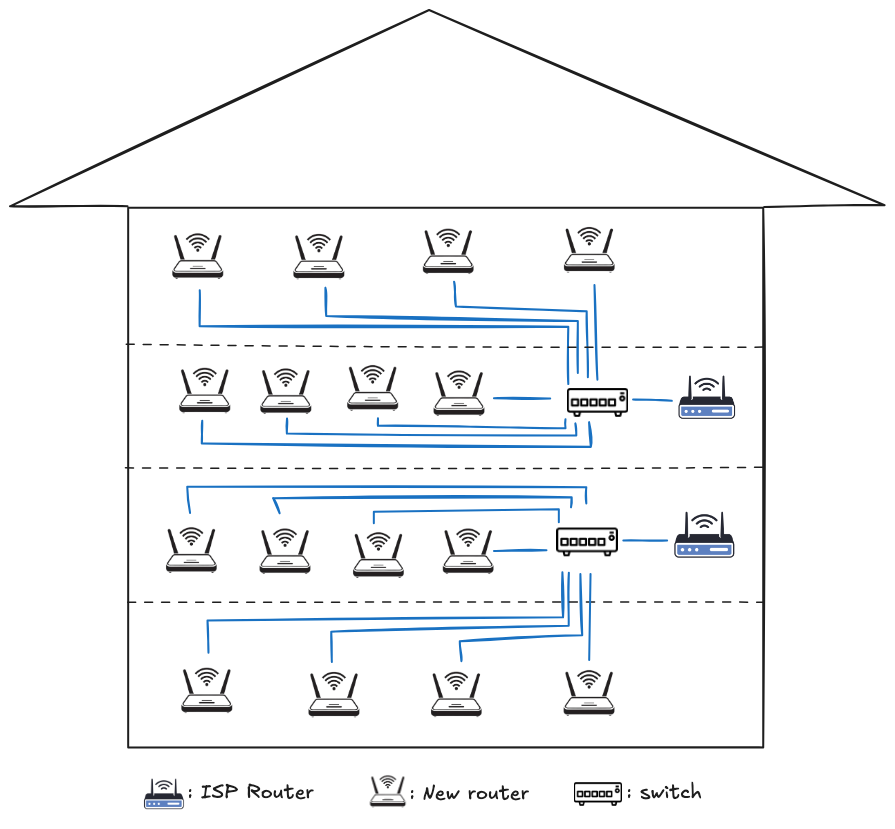
This was the cleaner design, but it meant running cables from the switch to every floor. If the ISP router and switch were placed on the second floor, I would need cables running to the first, third, and fourth floors.
The other option was to chain the devices. Since every router already had several Ethernet ports, I could connect one router to another and use the routers on each floor as small switches.
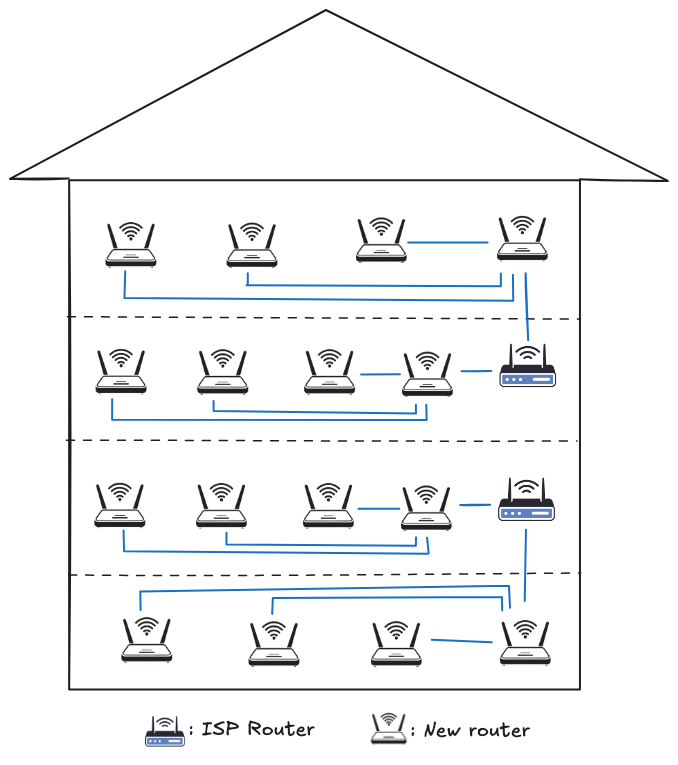
At first, I thought the router farthest from the main router would be much slower because its traffic had to pass through multiple devices. I expected the speed to decrease significantly after each hop.
The result was more surprising. In my tests, the speed was almost the same, so the chained design worked well enough for this building.
There was still one obvious weakness. If the main router on one floor failed, the routers connected behind it could also lose their connection. A dedicated switch would be easier to troubleshoot and would reduce this dependency.
However, replacing a local router was still easier than pulling a new Ethernet cable through several floors. So I accepted the trade-off.
You can chain Ethernet connections between devices, but configure the downstream routers as access points or bridges.
Planning Access Point Coverage
After deciding how to connect the floors, I still had to figure out how many access points were needed and where to place them.
I did not want to install one router in every room. That would be expensive, and too many access points could also create unnecessary radio interference.
Thankfully Ruijie had a website with a coverage planning tool. I could upload the floor plan and place a router in a specific location. The tool would then show the estimated signal coverage while considering obstacles such as walls and doors.
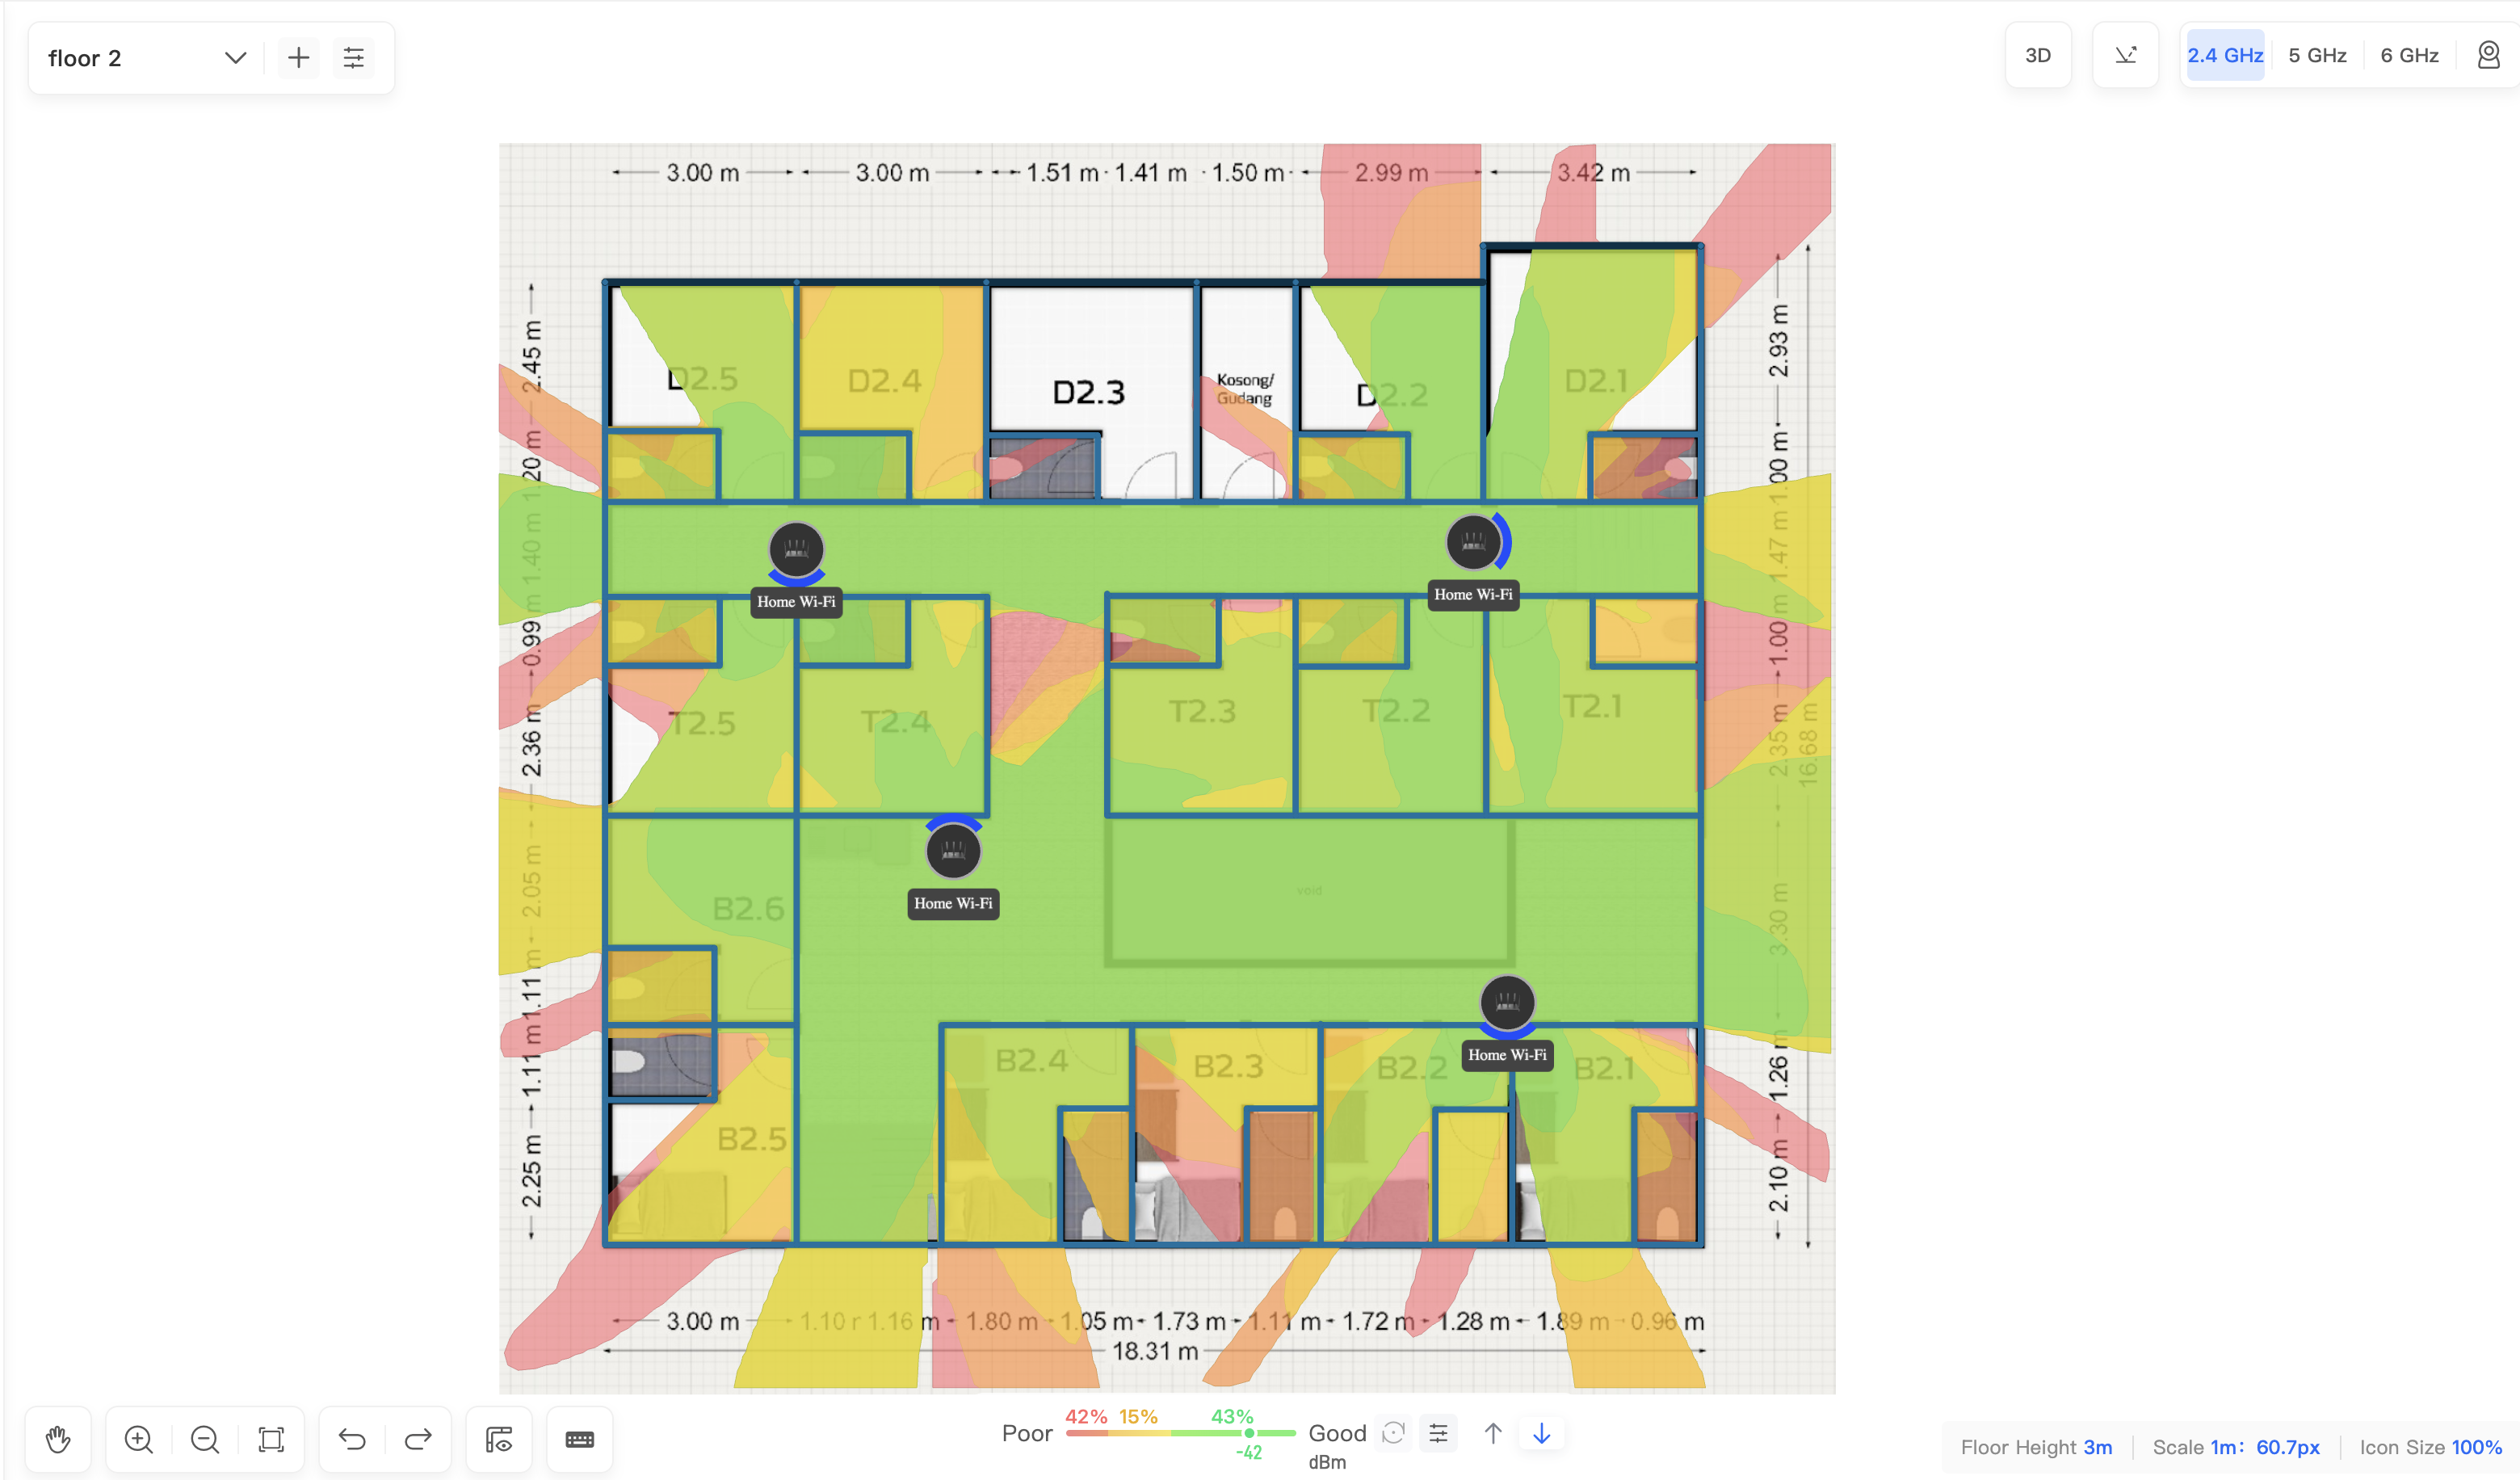
Using this tool, I could estimate how many access points were needed on each floor and where they should be placed.
The simulation was useful, but I did not treat it as a perfect prediction. Real buildings have furniture, metal doors, people, neighboring Wi-Fi networks, and other obstacles that may not appear on the floor plan.
After installing the access points, I still had to walk around the building and test the real signal and speed.
The final design required 12 new routers or access points.
That created another question. Did I really need to configure the Wi-Fi name (SSID) and password 12 times? Should every access point have a different Wi-Fi name?
Creating One Wi-Fi Network
At first, I thought using a unique Wi-Fi name for every router would be better. If someone had a network problem, I could ask which router they were connected to.
That would make troubleshooting easier in theory, but it would make the network annoying for users. When someone moved between rooms or floors, their device could remain connected to a weak access point. They might then need to disconnect manually and choose another Wi-Fi network.
I realized hotels and offices usually do not work this way. They can have many access points, but users normally see one Wi-Fi name regardless of which floor they are on.
I configured the access points with the same SSID, password, and security settings. This allowed the whole building to appear as one Wi-Fi network.
The same SSID does not guarantee perfect roaming. The client device still decides when to move from one access point to another. Some phones switch quickly, while others stay connected to a weak access point for too long.
Using one vendor helped because the devices could be managed together. This was one of the reasons Ruijie became more useful as the project grew.
Managing the Network With a Gateway
A gateway became the central point between the local network and the internet.
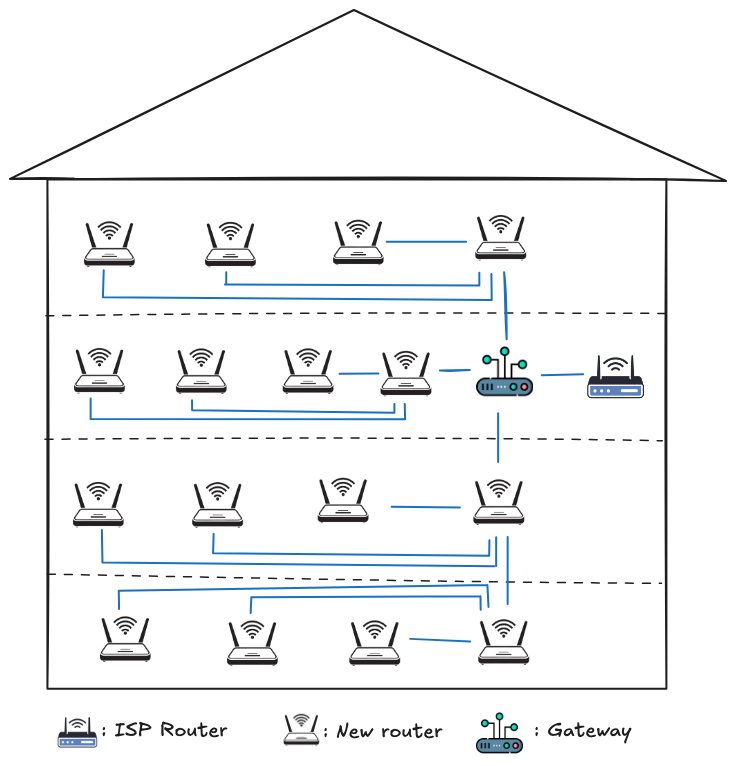
A gateway is a device that acts as the entry and exit point between two different networks. In this case, it connected the dormitory network to the internet and allowed network policies to be managed centrally. It sits between the ISP router and Ruijie routers.
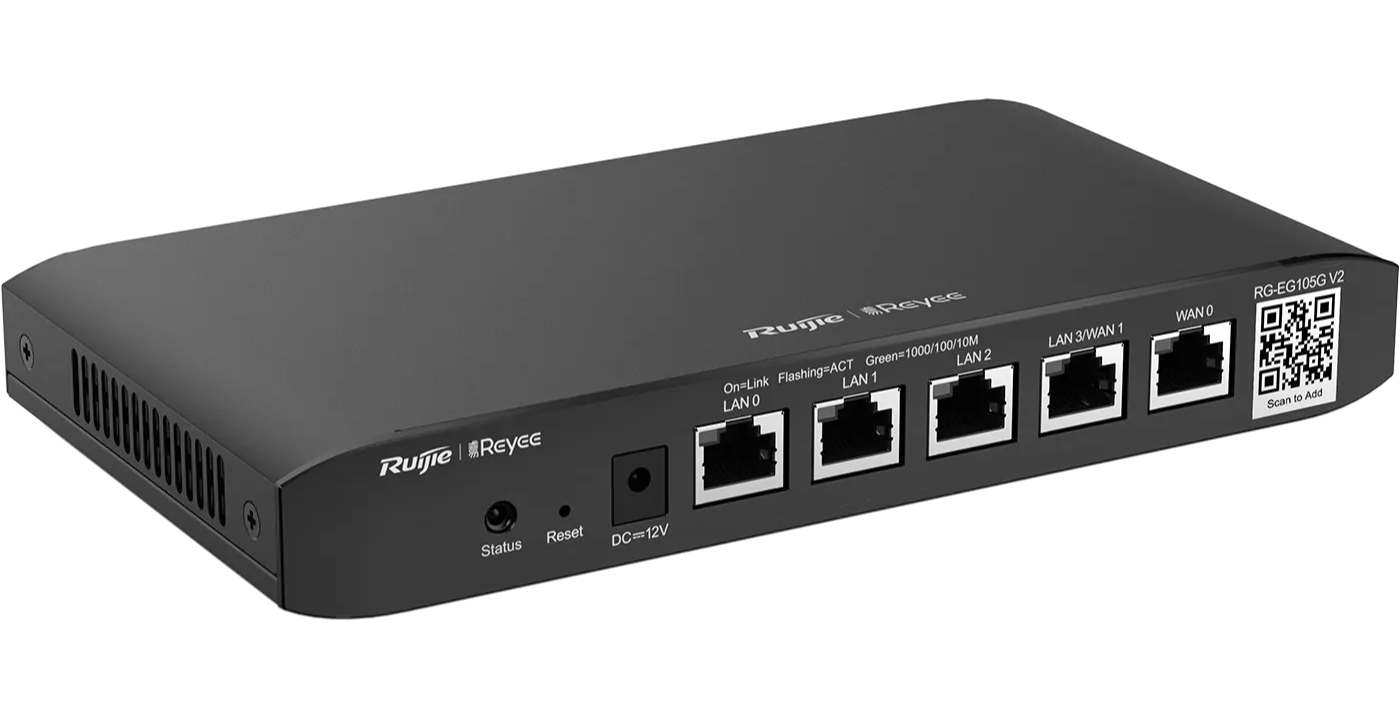
The main benefit was that I did not need to configure every router separately. The gateway could handle the connection to the internet and central network policies.
The network was already more stable because of the newer devices, better cables, and improved topology. But there was still another issue: bandwidth fairness. One person could use too much bandwidth and make the connection slow for everyone else. So I added some limits.
Ruijie Gateway allows me to create a captive portal. When people connect to Wi-Fi in a hotel or office, they sometimes see a login page before they can access the internet. I can assign an account to each user for them to use the internet.
The gateway allowed me to limit the number of devices per account. This was important because one user could otherwise connect many phones, laptops, tablets, and other devices.
I set the limit to a maximum of two devices per user. The assumption was that each user would have one phone and one laptop. I also set a maximum download and upload limit per account. Personally, I put a maximum of two devices per user and a 40 Mbps download/upload limit. When I set the limit to 20 Mbps, it looked like it should be enough, but residents still encounter buffering and loading during calls.
Is One Internet Plan Enough?
The Ruijie Gateway comes with two WAN ports, allowing connections from two ISP routers. However, considering the additional hardware costs and speed limitations, a single internet plan turned out to be sufficient to handle all the traffic. So, I canceled one ISP subscription and adjusted the network topology accordingly.
This change further reduced the dorm’s monthly internet expenses, allowing the entire network upgrade to pay for itself within just a few months.
Monitoring the Network With Ruijie Cloud
Even with a better network topology, problems can still happen. An access point can go offline, a cable can lose its link, the ISP connection can become slow, or one device can consume too much bandwidth.
Before using Ruijie Cloud, troubleshooting usually meant visiting the building and checking the devices manually. With Ruijie Cloud, I could monitor and configure the network from my phone through the internet. I don’t even need to be connected to the dormitory Wi-Fi.
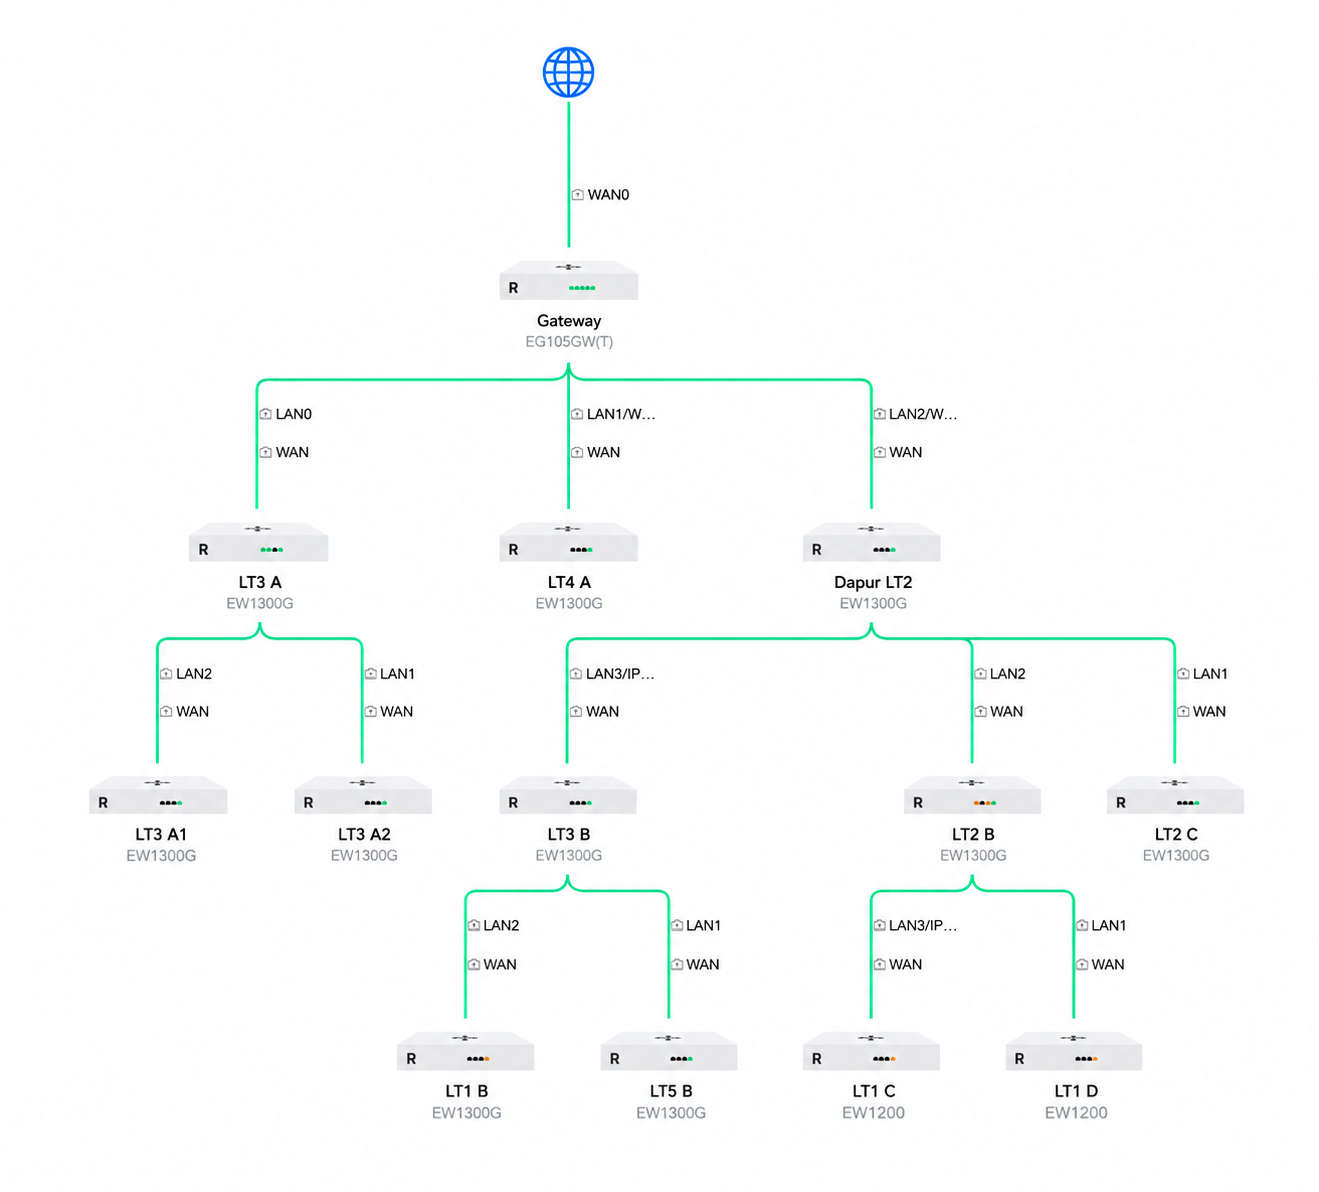
From the app, I could see the status of the routers, gateways, ports, and access points. I could also monitor connected devices and bandwidth usage for each user.
Sometimes, an issue could be solved by restarting a device. I could do that directly from the app instead of walking to the affected floor.
The monitoring system did not solve every problem automatically, but it helped me identify where to start. Instead of asking, “Why is the internet slow?” I could first check whether the issue came from the ISP connection, gateway, access point, port, cable, or a specific user.
The Final Setup
The final network used one internet plan, a central gateway, Ethernet connections between floors, 12 Ruijie access points, one Wi-Fi network name, bandwidth limits, and Ruijie Cloud monitoring.
The network was much easier to manage compared to the original setup. If a user reported a problem, I could check the access point, gateway, port, connected device, and bandwidth usage without immediately checking every router in the building.
The final design was not perfect. A dedicated switch and a more centralized cable layout would have made the network cleaner. The chained design also meant that a device in the middle of the chain could affect the devices behind it.
However, the network became stable enough for the dormitory, and troubleshooting became much easier.
Final Thoughts
The original network grew one router at a time. Whenever someone complained about a weak signal, we added another router. Eventually, the dormitory had more than 20 routers, but it was still difficult to know why the internet was slow.
At first, I thought the solution was to buy better routers. That helped, but it did not solve everything. The cables, network topology, access point placement, bandwidth usage, and lack of monitoring were also part of the problem.
The biggest improvement did not come from buying the most expensive router. It came from understanding how the whole network was connected, testing each assumption, and managing the devices from one place.
If you want a much more detailed tutorial on how to set everything up, let me know!